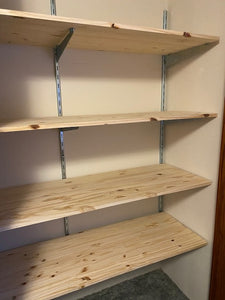
- Importance of Wall Standards
- Veresatility of Shelf Brackets
- Installation Guide
Wall standards are not just metal tracks affixed to a wall; they form the versatile backbone of shelving systems. Ideal for both commercial and residential use, these standards establish a flexible yet robust storage solution. They enable easy adjustment of shelf brackets to accommodate various item sizes while supporting substantial weight. These variations cater to diverse designs and preferences, ranging from heavy-duty options for commercial and home storage to sleek, minimalist designs for retail spaces and home living areas.
Capitol Hardware offers a selection that includes surface mount and recessed wall standards. Our featured collections are:
- C-line Super Heavy-Duty Surface Standards: For robust commercial applications, garages, and basements. Available in lengths from 36” to 96”.
- A-line Medium Heavy Duty Perimeter Hardware: For retail spaces, bedrooms, and offices. Available in lengths from 36” to 96”.
- Recessed Wall Standards: For a clean almost invisible wall standard, gives a floating shelf appearance. Available in 72” and 96” lengths.
Benefits of Using Wall Standards
- Adaptability: Easily adjust the height and spacing of shelves.
- Durability: Designed to handle significant weight, making them ideal for any application.
- Space Efficiency: Maximize vertical space, crucial for limited floor space areas.
The Role of Shelf Brackets in Functional Design
Shelf brackets are crucial for both functionality and the overall look and stability of shelving units. Capitol Hardware's collection of shelf brackets and accessories offers a range of styles and sizes, ensuring there's a fit for every need and decor style.
Selecting the Right Shelf Brackets
- Load Capacity: Choose super heavy-duty C-line brackets (paired with C-line standards) for nearly unlimited weight capacity, or medium heavy duty A-line brackets (paired with A-line standards) for a less industrial look that can still handle the weight of almost any items you plan to store or display.
- Size, fit and security: Ensure the bracket size is appropriate for the depth of your shelves, and add shelf rests as needed to securely hold the shelves in place. Bracket length should be no more than 2” less than shelf width.
Installation Guide: Setting Up Your Wall Standards and Shelf Brackets
Tools and Materials Needed
- Stud Finder
- Level
- Screwdriver or Drill
- Wall Standards and Shelf Brackets
- Shelves (Wood, MDF, Melamine, Glass)
- Shelf Rests, if needed
- Measuring tape
- Pencil
- Wood Screws that are a minimum of 2-1/2” long (#14 FHWS for C-line, #8 FHWS for A-line)
Step-by-Step Installation
- Locate Wall Studs: Note: To be used with wood studs only! Use a stud finder to locate the studs in your wall, as the standards must be anchored securely.
- Plan Wall Standard Placement: Depending on the stud spacing, plan where to place the standards for optimal support.
- Measure and Mark: Use a measuring tape to measure the desired height for the first standard. Mark this height on the wall using a pencil. Use a level to make sure the mark is perfectly straight.
- Attach the First Wall Standard: Position the slotted wall standard over the marked height and align it with the wall studs. Make sure it's level. Use a screwdriver to secure the standard to the wall studs using flat head wood screws.
- Spacing and Leveling: Depending on your needs, determine the spacing between each standard and mark their positions accordingly. Use a level to ensure each standard is straight and level before securing it to the wall.
- Install Remaining Standards: Repeat the process for each additional slotted wall standard, making sure they are evenly spaced and level.
- Attach Shelf Brackets: Select brackets based on shelf depth and load requirements.
- Place the Shelves: Choose from various materials noted above and secure them to the shelves with shelf rests as needed, depending on material type.
- Final Checks: After everything is in place, double-check that all standards are securely fastened to the wall and that accessories are properly attached.
This installed shelving system can be customized and reconfigured as needed for specific storage or display requirements.


Comments